SAHI Revisioned
Picsellia's new tiling model improves object detection by preserving resolution, especially for smaller objects, while offering flexible tiling modes.
Picsellia Team
·6 min read
Ready to build computer vision?
Go from raw images to production models. Free trial, no credit card, cancel anytime.
As most of you reading this blog know, SAHI stands for Slicing Aided Hyper Inference. It has made it easier for developers to detect smaller objects on the screen without having to retrain their models.
 Sahi computer vision tiling
SAHI at Picsellia
In the beginning, SAHI was employed from a public repository available on GitHub. The code did not belong to Picsellia. But our team wanted to do more and unfortunately, SAHI was not flexible enough for us. Hence, we redeveloped the core functionalities of SAHI and are now ready to launch our own tiling model. For Alexis, Software Engineer at Picsellia, "tiling" is a more fitting term for their model compared to SAHI. Let’s find out why.
Tiling - What, why and when?
Before an image arrives into the neural network for prediction and further processing, it is resized to a square format. Resizing an image involves reshaping and dimensionally reducing an image into a 640x640 square. Hence, after resizing, the resolution of the concerned image diminishes and valuable information may be lost. Tiling is useful to bypass the impact of losing information during resizing.
In simple terms, tiling adjusts the image content according to the size of the objects. Larger objects typically don't require tiling, while smaller objects need greater focus to ensure accurate detection, making the model's training process more efficient.
 Sahi computer vision tiling 66f6a684cfaf64373c73fd23 66f6a677ce0d587b4bdca0dc presentation1 25203
Tiling is a crucial technique in image analysis for computer vision, enabling a closer examination of specific image regions while maintaining high resolution. This method is often applied to detect small objects within large, high-resolution images. In simple words, tiling is adjusting the image content to the object sizes. The bigger the object you need to annotate, the less likely you need to tile. The smaller the object, the more refocusing is required around it to make the model's training process easier.
Tiling - A Hyperparameter
According to Alexis, tile size can be treated as an additional hyperparameter while training a model because when you train a model with a tiling process, theoretically there is an optimal tile size for your problem and you need to find it. The performance of the model depends on how accurately sized your tiles are and to find the accurate size, you have to keep experimenting. The size of the tile greatly influences a model's performance, with the ideal range being between 500 and 1000 pixels.
However, applying tiling processes to a dataset is NOT the best option depending on the use case. Tiling will not always yield the best results, nor the most accurate ones. There are several tiling strategies available on the internet. Public repositories provide public codes for all of these different strategies.
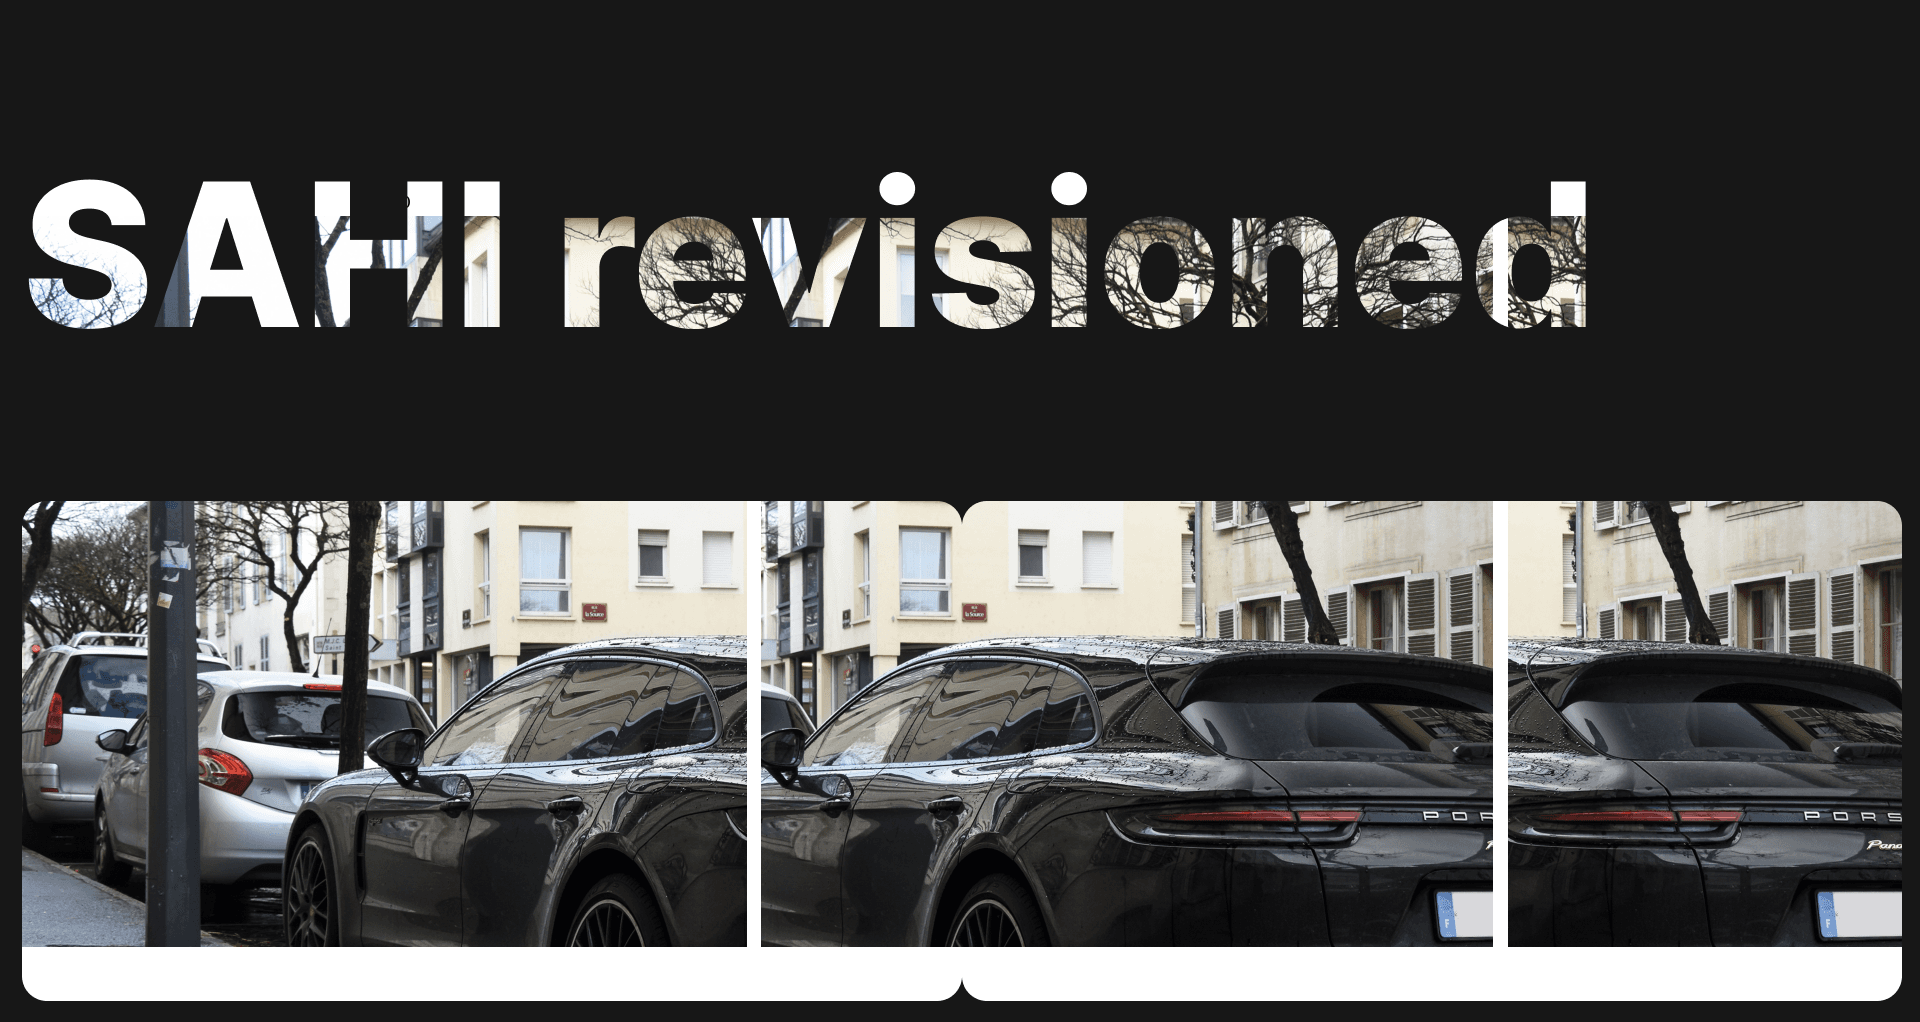
Tiling Modes
Let’s say, you have a picture 100 pixels in width and you are using two tiles to split it. The first tile covers 80 pixels out of the 100, but the second tile will only have 20 remaining pixels available to cover. How will you tile 20 pixels for an 80 pixels bounding box? There are several tiling ‘modes’ available to resolve this issue. In this case, SAHI focuses on following the ‘drop’ mode where, as the name suggests, SAHI drops the second tile with the 20 pixels. And with those pixels, SAHI also drops information present in them.
But there are at least 6-7 tiling modes to adjust the “border” tiles (like the 20 pixels tile in the previous example) and at Picsellia, the team is implementing most of them to prevent the loss of information during the training process. Having several tiling modes also provides flexibility to the users to decide which tiling mode they want to implement for their specific use cases, empowering them to take control of their data and model training.
Some of the tiling modes include -
Constant: this is a classic use case, enabled by default.
 Sahi computer vision tiling
Drop: this is what SAHI did.
 Sahi computer vision tiling
Reflect: apply a reflection of the tile until the tile is complete. Similar to a mirror.
 Sahi computer vision tiling
Edge: Taks the last row or column of the pixel and repeat it until the tile is complete.
 Sahi computer vision tiling
Wrap: Repeat the tile until the tile is complete.
 Sahi computer vision tiling
NMS or NMM
Object detection models often generate duplicate detections for the same object due to overlapping bounding boxes. Non-max Merging (NMM) merges overlapping boxes into a single detection. It builds groups of overlapping detections and combines their properties to create a more consolidated result. On the other hand, NMS or Non-max Suppression is an algorithm that addresses double detection by keeping the most confident bounding box and discarding the rest. It works by comparing overlaps between boxes based on the Intersection-Over-Union (IOU) value, eliminating less confident detections. Between the two, NMS is faster and should be the default choice for most cases. NMS is almost always used when a prediction is made with an AI model. NMM is an additional step needed when merging back the tiles' annotations. However, NMM is useful when more precise merging of overlapping detections is needed, especially when objects are under-detected. Both methods can be tested and adjusted depending on the specific requirements of the task.
Conclusion
SAHI has been a valuable tool for improving object detection, especially for smaller objects, without the need for extensive retraining. However, the Picsellia team recognized its limitations and took the initiative to develop a more flexible and comprehensive tiling model. They have introduced a more refined approach to image processing, allowing for high-resolution analysis without losing important details.
The flexibility of various tiling modes and the ability to treat tile size as a hyperparameter gives developers greater control over the training process, making it easier to tailor solutions for specific use cases.
Picsellia’s approach to tiling empowers developers to achieve better performance in their computer vision models, leading to more precise and efficient model training. Book your demo now!
Related from Picsellia
Train models your way
Use pre-built pipelines for YOLO, SAM2, and more — or bring your own code with PyTorch, TensorFlow, or Hugging Face.
Explore the AI LaboratoryTrack every experiment
Log metrics, parameters, and artifacts automatically. Compare runs side by side and ship better models faster.
See Experiment TrackingStay up to date
Get the latest posts on computer vision, MLOps, and AI delivered to your inbox.
Related articles

From Computer Vision to Industry 4.0: How Scortex Is Shaping Automated Visual Inspection
Discover how Scortex leverages AI and computer vision for automated visual inspection, from defect detection to anomaly detection and real-time insights.

Mastering Data Annotation for AI Projects in 2025
This article will discuss the importance of data annotation in AI and the best practices and strategies for overcoming labeling hurdles.
2025 Trends in Computer Vision: What to Expect
Learn about the upcoming Computer Vision trends in 2025.